
Selasa, 23 September 2014
Space Hulk Genestealer tutorial (Quick and easy)
Ok, so a confession... I started painting the Space Hulk Terminators from the last release and never finished them. I didn't even start the Genestealers, so now I want to correct that by painting these guys up quickly. I hope to spend a bit more time on the broodlord, but the main ones need a quick paint job. Below is a tutorial that's basically a drybrush and wash technique to paint up the 22 genestealers fast. Should look decent on the table top, definitely better than table top.
Read more »
Selasa, 16 September 2014
Ork Mek Tutorial
Here's the new Plastic Ork Mek all painted up in Evil Sunz colours. I wanted to go with a more traditional Mek look (red with blue pants), but it would be easy to swap the feature colour out for another clan pretty easily. The magnetized arm looks decent, and I painted up both weapons so that they are available in case I ever get a game in.
As usual, video after the break and painting guide lower down as well as lots of pics of the finished model.
 Read more »
As usual, video after the break and painting guide lower down as well as lots of pics of the finished model.
Minggu, 14 September 2014
Space hulk 2009 Unboxing
I'm excited about the re-release of Space Hulk... its a good chance for me to finish painting the figures from the 2009 version. I dug up some pictures from the archives (below) to show what was in the box that time around. I'm also working on some painting tutorials to get up for the new edition. From what I've read the contents are virtually the same. I'm curious to see the special rules for other chapters... maybe they'll release rules for other races like they did back with 2nd edition Space Hulk.

Read more »
Read more »
Minggu, 17 Agustus 2014
Imperial Guard Commissar Tutorial (plus video)
Or Astra Militarum Officio Prefectus whatever the trademarked name is now.
I really like the new single sprue charactors, so that's why I painted this guy up. Just a quick paint with nothing fancy. Simple and effective.
For the black I used my typical, base + highlight then wash to tone down the highlights. I suppose I could mix black and grey for the first highlights, but I think this works well enough. With black its often a good idea to smooth out the highlights with a little black to help with the transition. The same goes with most base colours, but especially with dark ones where the layer is quite a bit lighter than the base.

Read more »
I really like the new single sprue charactors, so that's why I painted this guy up. Just a quick paint with nothing fancy. Simple and effective.
For the black I used my typical, base + highlight then wash to tone down the highlights. I suppose I could mix black and grey for the first highlights, but I think this works well enough. With black its often a good idea to smooth out the highlights with a little black to help with the transition. The same goes with most base colours, but especially with dark ones where the layer is quite a bit lighter than the base.
Selasa, 05 Agustus 2014
Spacewoff Stormwolf/Stormfang Unboxing video
Here's a look at the new Spacewolf flyer... its a pretty cool transport, but I'm not sure I'm sold on the whole frost cannon thing. I'm going to paint it up to go with my bloodclaws to replace the land raider that I had been using (ineffectively) for them.
Its a decent looking kit, but most of the space wolf icons are built into it, so if you wanted to use it for something else it would take a bit of work.
Its a decent looking kit, but most of the space wolf icons are built into it, so if you wanted to use it for something else it would take a bit of work.
Sabtu, 02 Agustus 2014
High Elf Sword masters Tutorial
I did a unit of these guys way back when Island of Blood came out, and its been one of the more popular videos on my youtube channel ever since. Well, my tutorials have changed a lot since then, so I thought it would be a good idea to paint another batch of them. I started doing these just before the long drawn out Ork release, so about half way through I switch over to the new video camera.
 Read more »
Anyway, the main difference with the painting techniques is that I sprayed them silver to start, gave them a blue glaze, then did all of the other colours. It cut out a bunch of steps, and I'm pretty happy with how the metal turned out.
Sabtu, 12 Juli 2014
Ork Meganobz/Big Mek Magnetization details
Here's some details about how I magnetized the Meganobz box. I think I covered every option, including magnetizing the head on the Big Mek so that he can be a Meganob. The kit makes it easy to swap the hands without magents. There is a peg on the arm that push fits into the fist, and you can make all the Killsaws, power klaws and combi-weapons without duplicating parts. This is great since GW has a bad habit of using the same part in two options (to save space on the sprue).
For the Kombi-shootas I used 1/16" magnets on each side as pictured below. Its really important to get this aligned as closely as possible since 1/16" is so small. Otherwise they are pretty simple.
For the Big Mek I use a 1/8" magnet in the head and shoulders since i had the room to go bigger. A corresponding 1/8" magnet went into the Teloporta and Kustom Force Field, but the boss pole (for Meganob option) only has a 1/16" magnet.
Pics below, and I'm happy to answer questions in the comments below.

Read more »
Mek Gun and Trukk Kitbash (1+1=4)
Here's a tutorial, or walk through on how I made 4 Mek Gunz from the Ork Mek Gun and Ork Trukk boxes. The basic idea is simple, use the Trukk wheels and bits to make gun carriages. I built the Tracktor kannon straight out of the box, and the other three are kitbashes... if you wanted you could mix and match all 4. I'd also recommend using other bits in your collection, but I refrained in the video to keep it simple... with the exception of the Kannon and Zapp gun from the Battle Wagon kit (I figure most Ork collectors will have one or two of those lying around.
Video after the break and pictures below. Any questions? ask away...

Read more »
Video after the break and pictures below. Any questions? ask away...
Kamis, 10 Juli 2014
Meganobz Assembly Video
Here's the full assembly video for the Meganobz. I wasn't sure if I was going to magnetize things when I started out, but by the end I basically magnetized every option. All of the hand weapons can be exchanged without magnets, but things like the Kombi options and Mek gear needed magnets. I'll post some more detailed pics of magnet placement shortly.
More pics and video after the break.

Read more »
More pics and video after the break.
Rabu, 09 Juli 2014
Meganob Size Comparison
I just finished assembling these guys and took some pictures beside other comparison models that I thought would be helpful for those of you on the intertubes. The comparison beside previous meganobz was done in a recent white dwarf, but I've added some extra ones, such as the big mek with Kustom Force Field, Space Marine Terminators and Centurions... see below.

Read more »
Read more »
Minggu, 06 Juli 2014
Warhammer Visions Issue 6
I haven`t been paying much attention to Warhammer Visions, but with the new Ork Codex this looks like its going to be the issue to pick up. In the video below I flip through the whole issue and give some first impressions. Basically, there are lots of cool pictures of the new Ork models, all of the paint splatter articles in the last month`s White Dwarf Weeklies, some golden deamon pics, kit bash with Tyranids, token hobbit and Fantasy stuff.
Sabtu, 05 Juli 2014
Ork Meganobz Unboxing
I`m excited to get these guys assembled and painted up. I love the extra options... although I`m not sure how I feel about the kill saws. We`ll have to see if those make sense, maybe in larger mobs a couple of them will be good to pop vehicles.
The Big mek looks decent, although building that option means you need to buy at least another box (to have enough nobz to make a mob). The kit looks like it should be pretty easy to magnetize, so we`ll see if I can make that work in the assembly video.
The Big mek looks decent, although building that option means you need to buy at least another box (to have enough nobz to make a mob). The kit looks like it should be pretty easy to magnetize, so we`ll see if I can make that work in the assembly video.
Jumat, 04 Juli 2014
Finished Ork Painboy (+ tutorial and guide)
Fresh off the painting table, here's the new Ork Painboy. He's painted up very similar to the White Dwarf version, with different coloured pants and some checkered bits. He's a fun model to paint, although I'm not sure I'd want too many of the same model on the table top at once... very unique and no weapons options.
I used the technical paints here for the patina finish on brass bits, rust on the metal and some of the blood splatter. Its the first time I've actually used Blood for the Blood God on a finished model and I think it turned out quite nice... I think the trick is to use it sparingly.
Anyway, it was fun to get back to painting after all of the unboxing and assembly I've done... I need to catch up after all of these new releases.

Kamis, 03 Juli 2014
Painboys side by side
I've just finished taking pictures of the new Painboy for the painting tutorial, and I thought I'd grab a couple of the older Painboy models off my shelf to compare. Obviously the claw hand is huge, but the rest of him is a little more heroic scale than the previous painboy and the mad doc.
I'll post more pics of the new finished painboy once I have the tutorial finished.


I'll post more pics of the new finished painboy once I have the tutorial finished.
Minggu, 29 Juni 2014
Shokk Attack Gun Done (and tutorial)
Here's the Shokk attack gun all finished and looking fancy. I focused on painting this guy rather than trying to do the guns conversion tutorial I have planned. Since he's so similar to the old model there weren't any surprises, but warp energy around the front of the gun adds a nice touch.


As usual, pics and the painting guide are below along with a video that shows most of the steps with some commentary.
Read more »
As usual, pics and the painting guide are below along with a video that shows most of the steps with some commentary.
Read more »
Gorkanaught deathstar combo
Ok internet, what do you think of this combo? With the new ork codex a lot of the old dirty tricks were nerfed... my 4 battle wagons with deff rollas aren't going to be much use... same goes for my Nob bikers. But its just a matter of time before we come up with some new dirty combos.
Here's the concept... take a Gorkanaught, beef it up as much as possible and do whatever you please. Add a KFF and lots of meks to get all your hull points and weapons back each turn. Heck, this might draw enough attention to let a wack of trukk boyz get across the board untouched.

Big Mek, KFF, 3 grot oilers, Da Fixer Upperz (115 pts)
Burna boyz, 2 burnas, 3 meks, 3 grot oilers (95 pts)
Gorkanaught, extra armour, grot riggers (275 pts)
Total 485 pts
You could do a similar combo with a Morkanaught, but since it can have a KFF you could just go with a normal HQ mek. Also, you can only have one Da Fixer Upperz per detachment. An alternative would be to have the Mek trail behind so he could give a KFF save to something else as well, but stay out of line of sight.
What does this combo do? Well first off you have a 5+ cover save from all attacks. Anything that gets through that has to penetrate 13 armour, any crew shaken becomes stunned with the extra armour. Next you have 5 hull points. Provided those don't all go in one turn you get to use your mek tools in your shooting phase to repair hull points, weapon destroyed and immobilized results on a 5+. In this combo you have three meks repairing on 5+ and the big mek repairing on 3+. Then at the end of your turn the grot riggers repair a further hull point on a 5+. On average you're repairing 2 hull points per turn and ignoring 1/3 of all incoming shots (invulnerable save against shooting attacks, not cover save). Of course its going to draw a ton of fire, but that's kind of the point. This will attract all of the deadly stuff leaving the rest of your army to get in the enemy's face and smash some skulls. You could double up on this combo, or do a similar one with a Morkanaught but then you're running out of heavy support options for other fun stuff.
Here's the concept... take a Gorkanaught, beef it up as much as possible and do whatever you please. Add a KFF and lots of meks to get all your hull points and weapons back each turn. Heck, this might draw enough attention to let a wack of trukk boyz get across the board untouched.
(note: meks wouldn't be equiped with Kustom Mega-blastas)
Big Mek, KFF, 3 grot oilers, Da Fixer Upperz (115 pts)
Burna boyz, 2 burnas, 3 meks, 3 grot oilers (95 pts)
Gorkanaught, extra armour, grot riggers (275 pts)
Total 485 pts
You could do a similar combo with a Morkanaught, but since it can have a KFF you could just go with a normal HQ mek. Also, you can only have one Da Fixer Upperz per detachment. An alternative would be to have the Mek trail behind so he could give a KFF save to something else as well, but stay out of line of sight.
What does this combo do? Well first off you have a 5+ cover save from all attacks. Anything that gets through that has to penetrate 13 armour, any crew shaken becomes stunned with the extra armour. Next you have 5 hull points. Provided those don't all go in one turn you get to use your mek tools in your shooting phase to repair hull points, weapon destroyed and immobilized results on a 5+. In this combo you have three meks repairing on 5+ and the big mek repairing on 3+. Then at the end of your turn the grot riggers repair a further hull point on a 5+. On average you're repairing 2 hull points per turn and ignoring 1/3 of all incoming shots (invulnerable save against shooting attacks, not cover save). Of course its going to draw a ton of fire, but that's kind of the point. This will attract all of the deadly stuff leaving the rest of your army to get in the enemy's face and smash some skulls. You could double up on this combo, or do a similar one with a Morkanaught but then you're running out of heavy support options for other fun stuff.
Sabtu, 28 Juni 2014
Ork Mek Unboxing, Assembly and Magnetization
Here's the new plastic Ork Mek boy, and I magnetized his one arm so that I could swap the kill saw and wrench depending on my list. Its pretty simple to do, just a 1/8" magnet in the body and a 1/16" magnet in each arm. I show how to set them in the video, nothing magic there.
Anyway, a cool model, and will be helpful to have to give a little variety besides the Mek in the lootas box.

Read more »
Anyway, a cool model, and will be helpful to have to give a little variety besides the Mek in the lootas box.
Jumat, 27 Juni 2014
Ork Mek Gun Assembly video
Here's a video showing how the new Mek Gun assembles up. I have plans to kitbash the left over bits and a trukk to make some more guns for a whole battery. More pics after the break.

I was surprised how big this thing is... much larger than my old 2nd edition tracktor kannon and pulsa rokkit. Also, I'm a bit disappointed at the lack of magnetization options. I'm a bit disappointed by the guards on it too... the lack of options means if you have 5 of these side by side they are going to look pretty similar, which isn't what you're looking for with Orks.
It also isn't really compatible with the Kannon, zapp gun or lobba from the battle wagon kit. We'll have to see how my kit bash looks next to this.
Read more »
Kamis, 26 Juni 2014
Flash Gitz/Nobz Kitbash
Here's the results of my Flash Gitz/Nobz frankenstein project. When the Flash Gitz box came out they were being marketed in the White Dwarf to be interchangable... so I thought I'd give it a try. The first issue is that most of the Flash Gitz bodies have a much wider stance, and don't really fit on a 25mm base. So, I only used the narrow stance Flash Gitz bodies, but used all of the Flash Gitz chests to make the Freebooter nobz.
On the Flash gitz side, the nob chests fit fine with some minor modifications. I was able to get some neat snazz gun poses that were slightly different than the normal Flash Gitz, although not really enough to break up the monotony of that kit.
I left arms off of most of the nobz to wait for the new codex to land... I don't want to build of a mob only to find out that they weren't kitted out correctly.

Rabu, 25 Juni 2014
Shokk Attack Gun Assembly Video
Here's the assembly video of the new Shokk Attack Gun. I'm in the process of painting it up now, so that should be posted before the next round of releases come out this weekend. Man, its gone from famine to feast with Ork releases...


Sabtu, 21 Juni 2014
Shokk attack Gun Side by Side
I was curious to see how closely the new plastic Shokk Attack Gun matched the old one. Mine's metal, but its most recently been finecast.
Anyway, they are very close in size, so using both of them together would be find, unlike some other kits GW has replaced with updated models (I'm looking at you Mek gunz).
**update** added some mek gun pics at the bottom of the post
 Read more »
Anyway, they are very close in size, so using both of them together would be find, unlike some other kits GW has replaced with updated models (I'm looking at you Mek gunz).
**update** added some mek gun pics at the bottom of the post
Unboxing New Ork Mek Gun and Shokk Attack Gun
Here's a couple more unboxing videos for the latest Ork releases. The Shokk attach gun is particularly interesting because it shows how GW plans on replacing even more finecast stuff with plastic sprues. The size of this sprue is bigger than the ones that single characters come on, so its possible this is the first of many to come in this box size (and price range).
The Mek Gun box is intersting because it comes with lots of grotz, but only makes one gun. For the price that kind of sucks, so I'm going to try any kit bash this with a trukk box and make 3 extra guns. We'll see how many things in my bitz box I'll have to use to make that work.
The Mek Gun box is intersting because it comes with lots of grotz, but only makes one gun. For the price that kind of sucks, so I'm going to try any kit bash this with a trukk box and make 3 extra guns. We'll see how many things in my bitz box I'll have to use to make that work.
Selasa, 17 Juni 2014
Looted Wagon Tutorial
With all the talk about Looted Wagons being in/out of the new codex here's some pics of one that I started a while back. There's even a tutorial that I put up on Youtube explaining what I did. Its basically just a Leman Russ with the battle wagon turret and some bits from the stompa kit and other left overs from my bitz box. The turret hole is almost exactly the right size, so it doesn't take much to make the battlewagon one fit.

Senin, 16 Juni 2014
Gorkanaut Finished and Tutorial
Here's some pictures of my finished Gorkanaut, painting video and guide below. One of the keys with this guy was trying to get him done within the week so I could start on the Flash Gitz right away. With the Ork release being stretched out and with so many kits its going to be hard to keep on top of it all.
Anyway, the basic strategy with this guy was to base coat it in silver, add clan colours and some other details, wash then highlight. I'm using the Army Painter washes right now and really likeing them. Partly because of the price (about half GW's) and I also like the dropper style applicator. This helps when you're doing such a large model like this. I did all the checkers with decals to save time and applied some weathering powders after a dull coat spray to ensure they showed up nicely. Overall I'm happy with how it turned out, but now wish I had time to do another one as a Morkanaut. That'll have to wait because I have 10 Flash Gits waiting for my attention now.


Read more »
Anyway, the basic strategy with this guy was to base coat it in silver, add clan colours and some other details, wash then highlight. I'm using the Army Painter washes right now and really likeing them. Partly because of the price (about half GW's) and I also like the dropper style applicator. This helps when you're doing such a large model like this. I did all the checkers with decals to save time and applied some weathering powders after a dull coat spray to ensure they showed up nicely. Overall I'm happy with how it turned out, but now wish I had time to do another one as a Morkanaut. That'll have to wait because I have 10 Flash Gits waiting for my attention now.
Read more »
Sabtu, 14 Juni 2014
Flash Gitz Unboxing
Picked up a couple boxes of Flash gits today along with a box of nobs to try out the interchangeability of the kits. That will come when I do an assembly video, but for now here's the unboxing.
I did some Freebootaz a while back using pirate heads from ebay and Baddruck (below)... I'll have to repurpose them and the painboy that went with them.

No real surprises here since the sprue pics are on GW's website. No decal sheet, just three sprues, instructions and 40mm bases.
I did some Freebootaz a while back using pirate heads from ebay and Baddruck (below)... I'll have to repurpose them and the painboy that went with them.
No real surprises here since the sprue pics are on GW's website. No decal sheet, just three sprues, instructions and 40mm bases.
Senin, 09 Juni 2014
Gorkanaut Assembly video
Ok, got this posted as soon as I could and have already started painting this guy. With the flash gitz coming out on Saturday I've got to get this done.

Anyway, a decent kit but not a lot of options to customize it. Maybe forgeworld will make some conversion kits for it or something.
Read more »
Anyway, a decent kit but not a lot of options to customize it. Maybe forgeworld will make some conversion kits for it or something.
Read more »
Minggu, 08 Juni 2014
Gorkanaut Size Comparison
**Update** I've added some painted pics at the bottom of this post, but a whole lot more can be found on the painting tutorial page http://itslikewatchingpaintdry.blogspot.ca/2014/06/gorkanaut-finished-and-tutorial.html
As with any new model from GW, its always interesting to see how its size compares to existing ones. There seems to be a trend to larger kits (probably to charge more), so lets see how the Gorkanaut stacks up to other things.
A few items to note, the base is the new large oval base that was first seen with the Knight. Also, I haven't glued the legs yet, so it will stand slightly taller, but that said you can't really make them straight, so its hard to make it look like its mid step.
From my eyeball (ie, not measured), its about half the size of a stompa, double the deff dread. Its slightly bigger than the forgeworld mega dread but bulkier. Compared to the Knight, its shorter but blikier... so a similar feel on the tabletop.
As for transport capacity, 6 orks is pushing it, but that's normal for GW transports. 3 meganobs would be cozy (pic at bottom). I really hope its an assault vehicle, otherwise the transport capacity isn't very useful.
More pics after the break.

Read more »
As with any new model from GW, its always interesting to see how its size compares to existing ones. There seems to be a trend to larger kits (probably to charge more), so lets see how the Gorkanaut stacks up to other things.
A few items to note, the base is the new large oval base that was first seen with the Knight. Also, I haven't glued the legs yet, so it will stand slightly taller, but that said you can't really make them straight, so its hard to make it look like its mid step.
From my eyeball (ie, not measured), its about half the size of a stompa, double the deff dread. Its slightly bigger than the forgeworld mega dread but bulkier. Compared to the Knight, its shorter but blikier... so a similar feel on the tabletop.
As for transport capacity, 6 orks is pushing it, but that's normal for GW transports. 3 meganobs would be cozy (pic at bottom). I really hope its an assault vehicle, otherwise the transport capacity isn't very useful.
More pics after the break.
Read more »
Sabtu, 07 Juni 2014
Unboxing the Gorkanaut
Here's a first look at the Ork Gorkanaut, and whats in the box. No surprises here really, three sprues, instructions and the normal ork decal sheet. There are some nice bits, but not really much extra stuff like was in the stompa kit. I'm working on an assembly set next, and of course a painting video after that.
Sabtu, 31 Mei 2014
Badmoon Shoota Boyz
Below you'll see some badmoons that I've had on my to-do list for quite some time. I picked up the gas mas heads back in 2010 (link to the store below), and have been waiting to do these guys and the trukk for some time.
http://basicks.eu/shop/index.php?id_product=200&controller=product&id_lang=1
The Nob has a Black Orc head that has been modified to look like a gas mask, and the big shoota boy has a burna boy head. The gas mask heads came in a pack of 10, so I needed to makeup two more to finish out the 12 boy mob.
The techniques were similar to the Badmoon trukk I did a few weeks ago, except without the weathering powders. Fun guys to paint and a mob of 12 is small enough to be enjoyable.
 Read more »
http://basicks.eu/shop/index.php?id_product=200&controller=product&id_lang=1
The Nob has a Black Orc head that has been modified to look like a gas mask, and the big shoota boy has a burna boy head. The gas mask heads came in a pack of 10, so I needed to makeup two more to finish out the 12 boy mob.
The techniques were similar to the Badmoon trukk I did a few weeks ago, except without the weathering powders. Fun guys to paint and a mob of 12 is small enough to be enjoyable.
Rabu, 28 Mei 2014
How to Paint Grots (Gretchin, Ammo Runts, Grot Orderlies)
Here's another video leading up to the Ork Codex... looks like there's going to be a heavy walker in my near future along with whatever other goodies are released alongside the book.
Anyway, here's a tutorial showing how to paint up grot skin to go along with all of the other ork stuff I've got coming.
 Read more »
Anyway, here's a tutorial showing how to paint up grot skin to go along with all of the other ork stuff I've got coming.
Minggu, 25 Mei 2014
How to Paint Ork Flesh
I suppose this will work for Orcs as well, but for the moment the focus is on 40k orks. Here's a quick tutorial showing how to layer paint Ork flesh using citadel paints. Obviously this isn't the only way to do it, but is what I'm currently using. Depending on the look you're going for you can leave out a highlight or add a glaze, or even use different greens. Whatever the case, this method will work for any base-shade-layer-layer method.
I have an Grot/Ammo Runt/Grot Orderly/Gretchin tutorial coming next.
 Read more »
I have an Grot/Ammo Runt/Grot Orderly/Gretchin tutorial coming next.
Rabu, 14 Mei 2014
Ork Trukk Tutorial and Guide
Here's my latest addition to my Ork collection. I've had this truck assembled and primed for quite a while, but never got around to painting it (like so many other things). I've come up with a decent method of cutting time off Ork vehicles by spraying them with a silver base before painting. Its not a solid colour, more of a directional layer over a black base. From here the washes and a drybrush of necron compound finished with some weathering powders does the trick. The additional colours help breakup the mini, in this cae black, yellow and bronze.
I have some shoota boyz with after market gas masks to go with this, so hopefully I get to painting them up relatively soon.

Read more »
I have some shoota boyz with after market gas masks to go with this, so hopefully I get to painting them up relatively soon.
Read more »
Kamis, 08 Mei 2014
Legion of the Damned (tutorial and Guide)
My first memory of Legion of the Damned was when the first Games Workshop store opened in Toronto and they sold a limited edition Legion Sergent. Of course I was collecting Orks and my brother Blood Angels, so he got the guy. He ended up doing a full squad using regular marines with flames and bones painted on regular armour.
Anyway, these models aren't quite as old as that, and they're finecast (failcast?) but have still been around for a while. I've wanted to paint them up since the Space Marine codex came out last year, but only got around to them now. I dug out an old White Dwarf painting article (from the previous paint set) and basically followed it to paint up this squad. Nothing earth shattering, just your typical black armour, bones and flames, but the painting guide is below along with a video tutorial. Enjoy.
 Read more »
Anyway, these models aren't quite as old as that, and they're finecast (failcast?) but have still been around for a while. I've wanted to paint them up since the Space Marine codex came out last year, but only got around to them now. I dug out an old White Dwarf painting article (from the previous paint set) and basically followed it to paint up this squad. Nothing earth shattering, just your typical black armour, bones and flames, but the painting guide is below along with a video tutorial. Enjoy.
Selasa, 29 April 2014
Skaven Plague Monk Tutorial and Guide
Here's a painting tutorial of the Plague Monk that comes with the Screaming Bell/Plague Furnace kit. I have two of them, so as a result have an extra plague monk to mount on a 20mm base. I added a thin piece of cork and have had this guy ready to go for years. Anyway, its a fairly simple paint scheme so was pretty rewarding to paint up fast. Check out the video and let me know if there are any requests for future tutorials.
 Read more »
Kamis, 24 April 2014
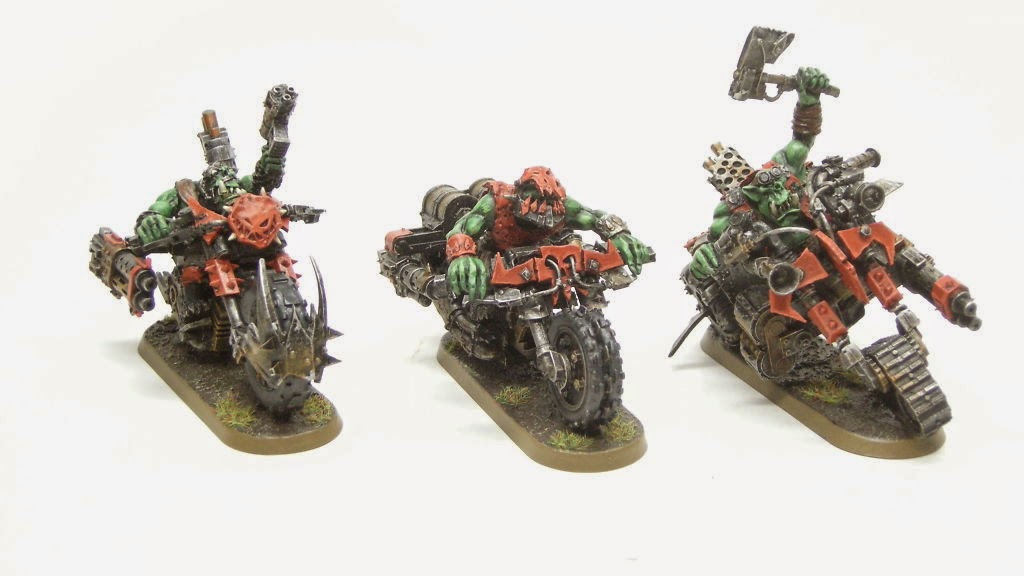
Ork Bikers Tutorial and Guide
Here's a whole wack of Speed Freakz to add to my army. I've always liked having bikers, but never got around to painting up the guys I had sitting around... so I figured with the rumours of a new Ork book coming soon I should get in gear. I used a simple method of base coating where I sprayed them black and did a heavy drybrush of Necron Compound. I think this worked out quite well, and the only thing I'd do differently if I were to do these guys again would be to add more red on the bikes.
In this batch are the three Forgeworld Nob bikerz as well as a squad of 6 regular bikers (5 boyz and 1 nob with power klaw). This is in addition to the Biker boss I already have and a squad of nob bikers... so maybe a couple more biker mobs and I'll be good to go.
Read more »
In this batch are the three Forgeworld Nob bikerz as well as a squad of 6 regular bikers (5 boyz and 1 nob with power klaw). This is in addition to the Biker boss I already have and a squad of nob bikers... so maybe a couple more biker mobs and I'll be good to go.
Sabtu, 12 April 2014
Dark Eldar Talos Pain Engine Tutorial and Painting guide
I picked up this model a long time ago when I was first starting my Dark Eldar Collection. The base colours were airbrushed along with a ton of other stuff in my army, so I don't have video of that. I like the look of this guy, although I'm not sure he'll ever see a table top. Anyway, its in the regular dark eldar paint scheme and the guide is below along with the video. Enjoy.

Read more »
Read more »
Selasa, 08 April 2014
Warhammer Forge Goblin Shaman (video plus painting guide)
This one was a quick project inbetween some of the longer ones to give me a break. Fantasy models tend to paint up quicker, so can be a bit more rewarding because they are done faster. This guy is from the night goblin command squad, and has some really cool effects with the smoke. I'm not sure I did it justice, but it painted up quick, so I'm happy to move on.
Check out the video and painting guide below.
 Read more »
Check out the video and painting guide below.
Selasa, 01 April 2014
Imperial Knight finished and Painting Guide
Here's that Imperial Knight I did the unboxing and assembly for. I did the heavy lifting by airbrushing the base layers and hazard stripes then brushed the details before adding the decals. After those wear sealed I did some oil washes and weathering powders to finish. Because its such a large model the fine details aren't quite there, but the overall model will look great on my shelf (or table).
Anyway, a basic painting guide is below along with the full video after the break.


Read more »
Anyway, a basic painting guide is below along with the full video after the break.
Read more »
Kamis, 20 Maret 2014
High Elf Loremaster of Hoeth (finished pics and painting guide)
Here's another High Elf character, the Loremaster of Hoeth plastic mini released with the last army book. Its a great dynamic model and fun to paint. Check out the painting guide below as well as a tutorial video.
 Read more »
Selasa, 11 Maret 2014
Imperial Knight WIP
I've been working on the main panels with an airbrush, and am ready to move over to hand painting. I'm not sure if this was the most efficient way, but it beats trying to mask off all the stuff I've painted (I think).
I'm using one of the standard schemes, and if the metallic turns out ok then it'll be pretty cool looking on the table.


I'm using one of the standard schemes, and if the metallic turns out ok then it'll be pretty cool looking on the table.
Sabtu, 08 Maret 2014
Ultramarine Chaplain FInished and Tutorial
Here's another of the new plastic characters from the Space Marine release. This guy has fantastic detail, and I enjoyed painting him as much as all the other plastic characters that have been released. I used the same basic scheme for black armour that I typically do, which is highlighting then bringing it down with a Nuln Oil wash after.

Anyway, a painting guide and full video are after the break.
 Read more »
Anyway, a painting guide and full video are after the break.
Senin, 03 Maret 2014
Imperial Knight Assembly Video
Wow... that took much longer than I expected. I embarked on an assembly and magnetization tutorial, and ended up with a video almost an hour long. It turns out there isn't much magnetization needed on this. There are some shared parts for the gun, and you can do a sort of hybrid version that lets you swap out the main bits. I had intended to make a short and concise video showing how to swap them out, but in the end I'll have to do a blog post with some screen shots.
Anyway, this is an impressive kit when assembled. Its 6" tall, and as you can see below, not as tall as a stompa, but still quite large. I've also compared it to a land raider and mega-dread below.
The assembly video goes through the whole process, start to finish, showing which parts I left off for better access during painting. There are some tips along the way, so if this is the sort of thing that interests you, you can watch it while you assemble yours (pausing between steps to catch up).
I hope to have it painted soon, but this thing is large, so I'm not sure how long that will take...

Sabtu, 01 Maret 2014
Imperial Knight Unboxing
I've just picked up one of the new Imperial Knights, and its impressive. I've got an unboxing video below and I have some thoughts about ridges on GW kits below. I'll be doing an assembly and magnetization video shortly and will follow up with a painting video.

Read more »
Read more »
Kamis, 20 Februari 2014
Dwarf Dragon Slayer (Finished and Painting Guide)
Here's the finished Dragon Slayer that I showed the other day. I said it before, but it bears repeating; this is an amazing model. Stunning pose and detail, and because its plastic I'm not concerned about it breaking or bending.

I used a fairly standard scheme, but recently picked up some edge paints, so those were used on the beard. Not sure what else is worth mentioning, but if there are any questions, please let me know.
 Read more »
I used a fairly standard scheme, but recently picked up some edge paints, so those were used on the beard. Not sure what else is worth mentioning, but if there are any questions, please let me know.
Minggu, 16 Februari 2014
Dwarf Dragon Slayer Unboxing and Assembly
Here's the new Dragon Slayer plastic character. These single pose plastic characters are stunning, and the dynamic pose on this guy really takes the cake. I'll be painting him up as soon as I get a chance and posting a video, but that may take a week or so.

Read more »
Read more »
Langganan:
Komentar (Atom)